July 28, 2009
The Inkblot is your cartooning information resource. From art supplies to drawing lessons to tips from the pros, you'll learn what it takes to be a cartoonist!
If you like this ezine, please tell your friends and family about it. Remember, it's free! If this was forwarded to you by a friend, do me (and yourself) a favor and subscribe! Just click the link below:
Inkblot Subscribe Page
Contents:
- 1. Issue Review
- 2. Start with the Basics
- 3. Stick Figure in Seven Steps
- 4. Tips & Tricks
Issue Review
Howdy friends! Welcome to another exciting issue of The Inkblot, your online resource for everything cartooning.If this is the first issue of The Inkblot youve read, heres a quick summary of some of the things weve discussed in past issues:
- The Flair Pen, and why its so wonderful for cartooning
- How to think up ideas and jokes for Cartoons
- We discussed the different art supplies used for cartooning, and which are my favorites
- We spoke with professional cartoonist Brian Crane who draws the internationally syndicated comic strip, Pickles, as well as cartoonist Frank Roberson, who draws the strip, Been There, and asked them about experiences and methods for cartooning
If youve missed any of these wonderful issues, theyre available on The Inkblot Back Issues page for absolutely no charge. Just go to
https://www.coolcartooning.com/back_issues.html.
Start with the Basics
When I was first learning to draw cartoons, I was anxious to jump right into drawing professional-looking cartoons like the ones in the newspapers and on Saturday Morning cartoons. I spent a long time trying to draw cartoon people and animals, but quickly became frustrated because I didnt understand how to go about it. My figures were bent, wobbly, and sloppy, and looked nothing like the ones in the papers. I didnt understand that to draw a successful cartoon character, its best to start with the skeleton; or, in other words, the Stick Figure!The Stick Figure is extremely important in cartooning, because its the skeleton that the meat of your figure hangs onto. Its your guide to ensure that your figure stays in the proper proportionsthat it isnt too tall, or that the hands are the same size, etc. More experienced cartoonists dont necessarily start with a stick figure every time, but nearly everybody uses some sort of guidelines. You can make the guides as detailed or as simple as you like, as long as your cartoon ends up looking the way its supposed to.
Stick Figure in Seven Steps
So, lets draw some stick figures. A stick figure is generally made up of simple lines and circle-shapes.
1. First, draw some guidelines to remind you how tall your character will be, and where his feet will hit the floor. Between the two guidelines, draw a long centerline, where your character will be. When completed, these lines form what looks like a large letter I.
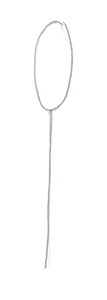 2. Next, draw an oval shape for the head. The top of the head should come roughly to the top guideline.
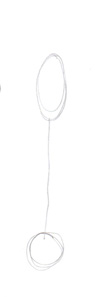 3. A round shape forms the pelvis
the part where the legs will connect. As will be shown below, the placement of the pelvis can vary depending upon the shape of your character.
3. A round shape forms the pelvis
the part where the legs will connect. As will be shown below, the placement of the pelvis can vary depending upon the shape of your character.
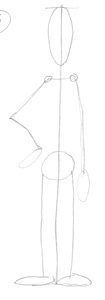 4. Add some lines for legs and arms, and some roundish shapes for feet and hands. Put them in the rough pose you want your finished character to assume. As I said before, all of these shapes can be varied depending upon the shape of your character. Remember the stick figure is the skeleton of your character.
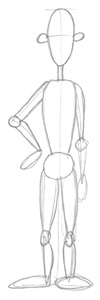 5. Flesh out the character using blobby, balloon shapes. The size of these shapes will show how thin or fat your character is, and helps to visualize the completed characters body.
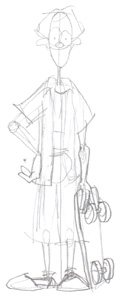 6. Finish sketching your character by adding skin: outline the body showing the way you want it to look when youre done. Add eyes, nose, mouth, hair, fingers, clothes, and other details to complete your character.
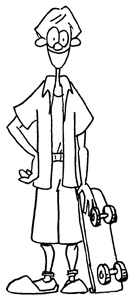 7. Finally, ink your character and erase the pencil lines!
These basic steps can be applied to any character you can imagine. After all, people come in all shapes and sizes!
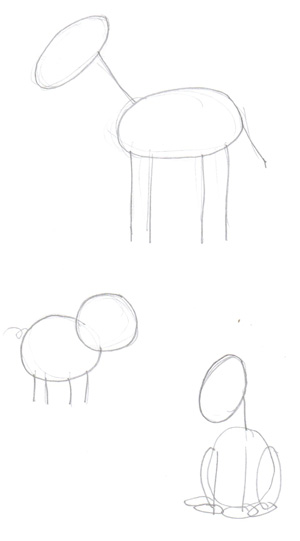
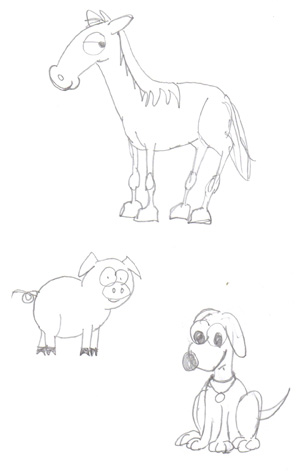
The Stick Figure is also useful in drawing animals, as you can see in the following examples:
More examples of stick figures of different shapes and sizes and in different poses will be added to the Sketchbook Pages area shortly. Also be sure to visit my
Amazon Store
at
CoolShops
for instructional books on creating stick figures for cartoon characters. One that I highly recommend is Getting Started Drawing & Selling Cartoons by Randy Glasbergen. He has a huge section devoted to using stick figures as the basis for drawing cartoon characters.
Tips & Tricks
Have you ever inked a drawing, but found you made the pencil lines too dark? Would you like to "clean up" the pencil lines on a particular drawing, but don't want to draw it over again from scratch? Well then, it's time you had a Light Box!A Light Box is exactly what it sounds: a box with a light in it. They are extremely useful for tracing. I like to use mine to clean up drawings. I often sketch out new ideas as I draw, so by the time I get to the inking stage, my paper is covered in pencil lines. The more pencil lines, the more difficult it is to erase them. With my Light Box, I can quickly produce a clean finished copy without any pencil marks at all.
Light Boxes can be purchased at most art stores, but you can also make your own without too much trouble. My dad made my light box more than 20 years ago, and it's still kickin'! He made a box out of wood with a plexi-glass cover. Inside the box, he placed a fluorescent light. Fluorescent lights work best because the light they produce is diffused, and the bulbs don't get very hot. If you're familiar with woodwork, or if you know someone who is, you should be able to make one without too much trouble. If not, then look into purchasing one. There are even drafting tables available that have the Light Box built right in! My cartoonist friend Frank Roberson, who draws the comic strip "Been There", has one, and he loves it.
If you don't have the money for a Light Box right now, and can't make one, there is an option I also sometimes use. It's a bit more cumbersome, and can take longer, but it still works. Scan your drawing into your computer, then use an illustration program like Photoshop or Microsoft Paint to "erase" any unwanted lines or marks. If you're careful, and with practice, this method will also leave you a clean copy of your drawing you can save to your computer and print out.
Thats all the time we have for this issue. In the next Inkblot issue, well talk about fleshing out your stick figure into a full-blown cartoon character, fit for the panel! Stay tuned, and as always
Happy Drawing!
Michael Richards
www.coolcartooning.com