
September 12, 2009
The Inkblot is your cartooning information resource. From art supplies to drawing lessons to tips from the pros, you'll learn what it takes to be a cartoonist!
If you like this ezine, please tell your friends and family about it. Remember, it's free! If this was forwarded to you by a friend, do me (and yourself) a favor and subscribe! Just click the link below:
Inkblot Subscribe Page
Contents:
- 1. Issue Review
- 2. The Next Step
- 3. Flesh Out
- 4. Tips & Tricks
Issue Review
Hello everyone, and welcome to an awesome new issue of The Inkblot, your online resource for everything cartooning.If this is the first issue of The Inkblot youve read, heres a quick summary of some of the things weve discussed in past issues:
- Step 1 of Drawing a Single-Panel Cartoon
- The Flair Pen, and why its so wonderful for cartooning
- How to think up ideas and jokes for Cartoons
- We discussed the different art supplies used for cartooning, and which are my favorites
- We spoke with professional cartoonist Brian Crane who draws the internationally syndicated comic strip, Pickles, as well as cartoonist Frank Roberson, who draws the strip, Been There, and asked them about experiences and methods for cartooning
If youve missed any of these wonderful issues, theyre available on The Inkblot Back Issues page for absolutely no charge. Just go to
https://www.coolcartooning.com/back_issues.html.
The Next Step
The first step we talked about is drawing Stick Figures. This is basically the skeleton of the cartoon person; the bones on which the flesh clings, and what will determine the basic size and shape of the character. As we saw, they arent as easy as they look, but they are essential. Many professional cartoonists, animators, etc., dont use stick figures anymore, but everyone uses a basic beginning point when they draw. Some use circles and rectangles, others use vague squiggles that approximates where the characters head and body will be in the cartoon. Ive always used stick figures (ever since I was about five years old, in fact), and they are my favorite beginning point. This is why I chose it as Step 1.Step 2 is Fleshing Out. This is where you stick muscles, skin, and clothing onto your cartoon characters. This can also be where you flesh out the scene of your cartoon; you decide what characters will be in the scene, what they will be doing and/or saying, and what, if any, the background will be. This is where the cartoon as a whole really begins to take some actual shape.
We arent going to discuss final cartoon development in this issue, however. Here well just talk about fleshing out your character.
Fleshing Out
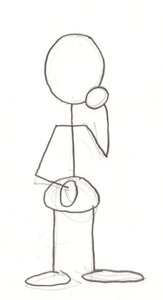 First, lets start out by drawing a simple stick figure.
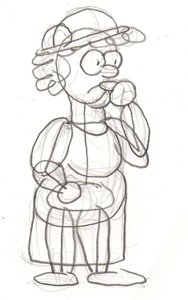 Next, draw some circles and sausage shapes to give the arms, legs, and torso a bit more shape. These underlying shapes are important, because they determine what the final character shape will be. Are you drawing a man or a woman? A fat, thin, or muscular person? Will the belly hang over the belt? Will the arms be flabby or stick-like? Just for a little variety, Ill make my figure an overweight woman.
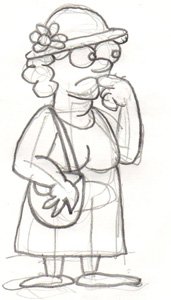 Last, put the skin and clothes on your character. First sketch out the clothing, then with a slightly heavier pencil pressure, connect the outer lines.
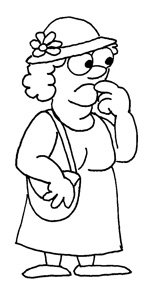 When you have everything the way you want it, ink your drawing, then erase.
Well take these same steps to do the entire cartoon panel.
Before going on to an actual cartoon panel, practice drawing stick figures and fleshing them out. When I was learning to draw, I would fill entire sketchbooks with nothing but stick figures, and then practice fleshing them out. Another thing I would do is cut pictures out of newspapers and magazines, tape them to a window, put a piece of paper over them, and transform the picture into a stick figure. I would then use the magazine picture as a guide when fleshing out the stick figure. I found it is a great way to learn how different simple shapes become differently-shaped final cartoons. Tracing paper works better, of course, or the use of a lightbox, so that you dont get arthritis standing at a window all day!
For more information and detailed drawing steps, please be sure to visit my
Amazon Store
at
CoolShops
for instructional books on creating and fleshing out stick figures for cartoon characters. One that I highly recommend is Getting Started Drawing & Selling Cartoons by Randy Glasbergen. He has a huge section devoted to using stick figures as the basis for drawing cartoon characters.
Tips & Tricks
This months tip is about erasing. This might be a weird tip, but its one that, when I finally learned it, helped me out A LOT. I began drawing cartoons in the late 1970s, before personal computers and fancy things like scanners had been developed. So we did things the old fashioned way. When making the final drawing, you had to be really careful, because this was what you would submit to the publisher, or client. After I would ink my cartoon, Id start erasing the pencil lines. Sometimes, as I would erase, the paper would get badly crinkled and occasionally would rip. Then I would have to get a new piece of paper, and start over!I discovered that to avoid wrecking the paper, I could either erase the pencil lines using eensy-beensy eraser strokes (which would take forever), or figure out a new way to hold the paper down. Taping the corners of the drawing didnt always workit would usually make things worse, as my erasing would often rip the corners off my drawingso I had to do something else. What I finally discovered is that if I hold my paper down with one hand, spread the fingers out wide, and erase the lines that were in the space between the index finger and thumb, the paper wouldnt go anywhere. Moving my hand around the drawing as I erased, I could erase all the lines, and end up with a clean drawing with no rips or wrinkles!
Nowdays, even if you wrinkle your cartoon, you can simply scan it into a computer, fix any errors in Photoshop or another type of graphics program, then print it out again. But Im set in my ways, and I still use the old methods of erasing when drawing. So practice careful, proper erasing. Using this simple method, you can erase your pencil lines quickly, without taking forever with tiny strokes!
Thats all the time we have for this issue. Next issue, well take our fully-formed characters and put them into the cartoon panel. Well take an idea, and develop it into a cartoon, fit for publication! Stay tuned, and as always
Happy Drawing!
Michael Richards
www.coolcartooning.com